Search This Blog

Would you like to join Stampin' Up!® - Come join my team, get discounts and make new friends. As long as you are in Australia you can join my team.

Thursday, April 25, 2013

Who loves Masking and Sponging?

I love Masking and Sponging. It makes everyone a bit of an artist and who doesn't like to think of themselves as a modern day Monet. We did three styles of this technique. The first using our beautiful and very large Swallowtail stamp. It was embossed with black embossing powder and then sponged using sponge daubers and three colours. Then a mask of the  butterfly was placed over the the stamped image and then the outside was sponged to make the butterfly pop.


Yes I know , you are probably saying "that looks like silver embossing to me" Yes you are right. I did many samples using all the different powders and this one took the best photo.

The next style of masking is one of my favourites. It always looks so difficult but the consensus was that it was the easiest and made a really WOW card.

I ripped some scrap paper in half to make two ragged edges. Then this is placed on the card leaving an area to sponge. The sponging in this technique uses a sponge rather than sponge daubers. I still like to use three colours for the first layer. Then I randomly stamp a few shapes or writing in either Early Expresso or one of the sponged colours, depending on what effect you are after. Then the scrap paper is removed and  WOW!

This is called Reverse Masking.


This one here is a mixture of Reverse masking and masking. If you look closely  you will see the leaves have been masked and then cut out. I got the background effect by ripping a hole in a piece of paper and then applying the ink the same as the one above.
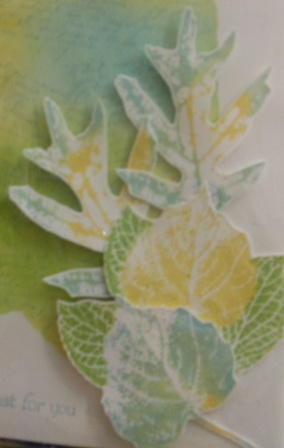


Lastly we did this little cutie. I love this style of masking but it can, be a little frustrating to get the mask just right. The secret is to use very thin paper, something like post it notes, and the more you use it the better, as it makes the mask paper thinner. Another tip is to cut the mask a sliver smaller than the image so that you do not get the white halo around it.
 
 
With this one the bashful blue heart was stamped first, a mask was then placed over it. Then the Crumb Cake heart was stamped slightly over the mask. Another mask is then needed for this heart. Finally the Always Artichoke heart was stamped and then the masks removed. Now it looks like the blue is in front and the green is at the back.

So what do you recon? Going to have a go at masking? Go on have a go and let me know how you went, I think you will love it.

Saturday, April 6, 2013

A new day time class

Due to popular demand I have decided to run a daytime class as well as the night time ones. So if coming out at night has stopped you from attending then here is your chance. So our first day time monthly class will be Wednesday 17th April at 10am. Please email or phone to book in.

April  – Please BYO basic tool kits and adhesives
Friday 12th - 7pm "Mothers Day and more" $10
Wednesday 17 th - 10am "Mothers Day and more" $10
Wednesday 17 th - 7pm "Mothers Day and more" $10

May  – Please BYO basic tool kits and adhesives
Wednesday 1st - 10am "To be advised "
Wednesday 1st - 7pm "To be advised "
Friday 3rd - 7pm "To be advised"

June  – Please BYO basic tool kits and adhesives
Wednesday 5th - 10am "To be advised"
Wednesday 12th - 7pm "To be advised"
Friday 14th - 7pm "To be advised"

July  – Please BYO basic tool kits and adhesives
Wednesday 10th - 10am "Stamp n stack" Christmas in July  $25
Wednesday 10th - 7pm "Stamp n stack" Christmas in July  $25
Friday 12th - 7pm "Stamp n stack" Christmas in July $25

August  – Please BYO basic tool kits and adhesives
Wednesday 7th - 10am "Fathers day and more" $10
Wednesday 7th - 7pm "Fathers day and more" $10
Friday 9th - 7pm "Fathers day and more" $10

September – Please BYO basic tool kits and adhesive
Wednesday 4th - 10am "To be advised"
Wednesday 4th - 7pm "To be advised"
Friday 6th - 7pm "To be advised"
Wednesday 25th - 10am "Childrens holiday class" $10
Friday 27th - 10am "Childrens holiday class" $10

October  – Please BYO basic tool kits and adhesives
Wednesday 9th - 10am "To be advised"
Wednesday 9th - 7pm "To be advised"
Friday 11th - 7pm "To be advised"

November  – Please BYO basic tool kits and adhesives
Wednesday 6th- 10am "Stamp n stack" $25
Wednesday 6th- 7pm "Stamp n stack" $25
Friday 8th - 7pm "Stamp n stack" $25

December – Please BYO basic tool kits and adhesives
Lets party while we have fun.
Wednesday 4th - 10am "Christmas gifts" $20
Wednesday 4th - 7pm "Christmas gifts" $20
Friday 6th - 7pm "Christmas gifts" $20

Tuesday, April 2, 2013

Gone to China

Back in February you may remember my post Love from China when my cousin Penny brought me back some fabric. 
Well she took the scrapbook page I made as a thank you to the lady in China. Here is a photo of the lady happily showing off my framed scrapbook page that she is going to hang in her little market shop.


I am rather thrilled at knowing that a piece of my art work is in China and being viewed by heaps of people just wandering around a market.

Sunday, March 31, 2013

April classes

Another month just flew by, oh my goodness Christmas will be here before we know it, yikes. I hope you all had a nice few days with family for Easter. I ate far too much chocolate and enjoyed every mouthful.
I thought I'd post the dates of classes for the next 3 months so you can update your calendars. I have some interesting projects planned for us and the children's classes.

The April class will be showcasing the Masking and Reverse Masking technique and a Mother's day card. You will also be sponging and I will introduce you to the "Sponge Dauber".  I am really looking forward to using the beautiful Swallowtail stamp for one of the cards.


Like the sound of the classes but can't make the dates?
Why not have your own special class. Gather 3 or more friends together and I will come to you.

April  – Please BYO basic tool kits and adhesives
Friday 12th - 7pm "Mothers Day and more" $10
Wednesday 17 th - 7pm "Mothers Day and more" $10

May  – Please BYO basic tool kits and adhesives
Wednesday 1st - 7pm "To be advised "
Friday 3rd - 7pm "To be advised"
Wednesday 29th - 10am "Childrens holiday class" $10
Friday 31st - 10am "Childrens holiday class" $10

June  – Please BYO basic tool kits and adhesives
Wednesday 12th - 7pm "To be advised"
Friday 14th - 7pm "To be advised"

Friday, March 29, 2013

Happy Easter to friends and family

What better way to say to all my friends and stamping buddies, Happy Easter than with a beautiful card using the Crosses of Hope stamp set.
I found this lovely card  on http://stampwithbrian.com/ He has done a beautiful job don't you think.

So let the card say it ..........

Friday, March 15, 2013

Oh no, it's nearly gone......


I saw this posted on Facebook and thought  "how appropriate" I too would have been sad if I had forgotten to place my order. Luckily I didn't forget and have received heaps of FREE products, yay.

Sale A Bration, is just the best time of the Stampin’ Up! year, and it’s better than ever, with no less than 19 free products to choose from with your qualifying order of $100.


There are many ways you can benefit from Sale A Bration........Try one or all of these.

Host a workshop and you can qualify for additional bonuses.
 
Love to shop? How about shopping and getting rewarded?

Join Stampin' Up!
 
Sale-A-Bration + Stampin' Up!'s 25th anniversary = 25% more Starter Kit products for FREE
Their is also a new recruit bundle including the following products from the 2013-2014 annual catalogue:
  • Happy Day Stamp Set
  • Modern Medley Designer Series Paper
  • Hardware Clips Essentials

Truly something for everyone. But time is running out  March 22nd is the last dat to place an order for these great FREE products.

Contact me now to book your workshop, place your order or for more information about joining Stampin’ Up!
If you would like your own copy of the Catalogue, plus a copy of the Sale-a-Bration brochure, email me and I will send you one (Australian residents only please).

Saturday, March 9, 2013

Tri Shutter Easter card

What a fun couple of nights for our March class, check out what we made.

First was the Tri Shutter Easter card. The Easter eggs were made by punching out 4 large ovals and then decorating each of them with our lovely In Colours. I cut out our envelope using my favourite tool the BIG SHOT. The little chick is the Bird Builder punch. I nipped off his tail feathers so he would fit into the cracked shell. Cute ey?
The panels were made using the Sycamore Street Designer Series Paper. Just love it. The front and back panels I used Island Indigo and Calypso Coral and dry embossed them. I love teaching this card as everyone gets such a kick out of the finished result. It always looks so hard and yet it is quite easy, just a lot of preparation.


Then we expored a few uses for the scallop circle punch. The flower is made up of 3 scallop circles and then they were distressed to pull them apart making 6 flowers, the petals were sponged and then layered and scrunched. The leaves were also made with the scallop circle punch then sponged.


Then lastly we did a tea bag style fold on this little cutie. We used 4 scallop circles and folded back 5 of the petals then turned it over and folded the edges into the centre. Joining them together with a brad. Aren't they just darling?


Saturday, March 2, 2013

March card classes

Time has flown and it is now March, are you ready for Easter?

The March class is about Easter and we will look at using the Scallop Circle punch in a few innovative ways. You will also learn how to make a Tri Shutter card, looks tricky but don't worry I have instructions for you to follow and take home.

When:
Wednesday 6th March 7pm start
Friday 8th March 7pm start

Where:
My studio at Wellington Point

Cost: $ 10

What to bring:
Bring your own basic tool kit, adhesives and dimentionals If you do not have any adhesives or dimentionals they can be purchased from me on the night if you wish.

Please confirm if you are coming so I have enough kits prepared.

Monday, February 25, 2013

Ideas a plenty...

I love being a Stampin Up demonstrator. We get so much support from other demonstrators and the ideas for projects is never ending. Each month all the Paper Angels get together and discuss new products, events and exchange card ideas. Two of the cards that I saw and loved have now been reproduced and added to my collection.
Notice how the bottom butterfly has been punched out of the Whisper White. Such a cute idea. The card base was made from the In colour, Summer Starfruit. I then added the layer of Sycamore Street Designer Series Paper. I punched out a Summer Starfruit Elegant Butterfly and a Rich Razzleberry Elegant Butterfly. I stamped the sentiment  from the Loving Thoughts  stamp set in Rich Razzleberry. The designer series paper was FREE from the Sale E Bration catalogue.
This one I just love. The dangly stars and hearts are just so cute, don't you think?

Sunday, February 24, 2013

Back to the ole blackboard days

I love this technique that is around at the moment. It is the blackboard technique and it allows for you to be messy. I held back on trying it out as I find it a bit hard as I try not to be messy.
However at our Demonstrators meeting today I was taken out of my comfort zone.

Rebecca Ross showed us her version of the technique and I must say I loved it. We stamped images in White Craft ink and then embossed in white embossing powder. Then we lightly dragged the white ink across the card with a sponge, making it look like the rubbed out chalk on a blackboard.

Well I liked it so much that I had to try it again when I got home. Here is my version.

Saturday, February 16, 2013

On a roll

Well I had a productive day today. I finished creating the 3 cards for my next stamp class in March and have even written instructions for 2 of them with pictures. So make sure you keep either Wednesday 6th or Friday 8th free and come along for a big night.

I then wanted to stock up on some cards so here they are.

The first one was CASED but I don't know who from. If you recognise your work thank you for the inspiration. I used Tangerine Tango card and teamed it with Very Vanilla, Tempting Turquoise and Old Olive. Don't you just love the Colour Coach for helping you put colours together? I sat the Elegant Butterfly Punch on a 23/4 inch DSP circle. The Birthday sentiment is from an old SAB set called So Happy for You. I keep dragging it out as I love the font.
This one I had to really scramble to get things to work. I thought I had Pool Party ribbon but I must have used it all, so I got my Very Vanilla Seam binding ribbon and dragged it through the Pool Party stamp pad. Yuk, that looked dreadful it didn't look at all like Pool Party. So I decided to wash it out and "what do ya know" it came out this nice Pool Party colour. Yipee... I then wanted it to look scrunchy so I squeezed it up and then put the heat gun on it to dry it out and set the creases. I stamped the Happy Birthday sentiment with Versamark and embossed it with White embossing powder. I then used a paint dauber and Pool Party ink to colour over the card. I rubbed the ink off the embossing with a tissue to make it pop.

My last card is my favourite. I have been wanting to play with this Dress Up Framelit Die for some time. Anyone that knows me and my little ladies will know how excited I was when I saw this in the catalogue. The sentiment came from the All Dressed Up stamp set. I used Early Expresso Co'ordinations card on the dress stand to get an aged look.

Thursday, February 14, 2013

Happy Valentine's day

Who got spoilt today?
I had coffee and cake with my lovely husband at our favourite place Cafe Mila. Then came home and played for the afternoon in my craft room. Who could ask for more.  I was working on my next card class and I'm quite excited with what I have come up with. No peeks just yet, you'll just have to wait a tad longer.
.
This months class included a Valentine card of course. I brayered Real Red over the Glimmer paper to give it a pinkish tint. The DSP came from the pack Festival of Prints. Such a versatile little pack. The hearts were cut out of the Heart to Heart retired punch. The sentiment came from my very favourite stamp set Teeny Tiny Sentiments.  This is the perfect stamp set for someone that is just starting out as it has every type of sentiment they would need.

The other two cards we made showed how easy it is to use the same layout and make a small change to the embellishment thus changing the look of the card.
Isn't the DSP lovely I was lucky enough to get it as a free Sale A Bration gift. The new Seasonal Catalogue has so many yummy products that I just had to have. The bonus of course was getting the free gifts.

 
 I hope you all had a great Valentines. Now time for bed and sweet dreams of what I have in store for my next class.

Saturday, February 9, 2013

Our new Seasonal Catalogue and Sale A Bration

What more temptations can Stampin Up come up with?

Sale A Bration, that’s right, it’s everyone’s favourite time of the Stampin’ Up! year, and it’s better than ever, with no less than 19 free products to choose from with your qualifying order of $100.


There are many ways you can benefit from Sale A Bration........Try one or all of these.

Host a workshop and you can qualify for additional bonuses.
 
Love to shop? How about shopping and getting rewarded?

Join Stampin' Up!
 
Sale-A-Bration + Stampin' Up!'s 25th anniversary = 25% more Starter Kit products for FREE
Their is also a new recruit bundle including the following products from the 2013-2014 annual catalogue:
  • Happy Day Stamp Set
  • Modern Medley Designer Series Paper
  • Hardware Clips Essentials

Truly something for everyone! How will you party?

Then we have the new Seasonal Catalogue. So take a deep breath and check out the most fantastic products. It has 39 pages chock-full of yummy stamps and accessories. It has a lovely vintage feel, and there are so many pretty stamps and embellishments to take your crafting to the next level.

Have a flick through the Seasonal Catalogue and try to resist all the pretties.
Contact me now to book your workshop, place your order or for more information about joining Stampin’ Up!

If you would like your own copy of the Catalogue, plus a copy of the Sale-a-Bration brochure, email me and I will send you one (Australian residents only please)

Thursday, January 31, 2013

February classes

What a lovely way to start back by making something for your valentine. We will be making a Valentines day card using some of the beautiful Glimmer paper. We will also be making other cards with LOVE in mind but using the beautiful new sentiments from one of the new stamp sets.
As it is my birthday month some lucky person will be receiving a gift to help me celebrate.


When:
Wednesday 6th February 7pm start
Friday 8 th February 7pm start
 
Where:
My studio at Wellington Point

Cost: $ 10

What to bring:
Bring you own basic tool kit, adhesives and dimentionals I have a small supply just arrived of Snail refills, Dotto refills and Dimentionals. These can be purchased from me on the night if you wish.

Please confirm if you are coming so I have enough kits prepared.

Friday, January 25, 2013

Happy New Year

Wow where did 2012 get to? Happy New Year to everyone I do hope you all had a great Christmas and feel refreshed for the year ahead.
I have some great ideas for classes with new and old techniques so grab your diaries and organise your crafting year.

 
February - Please BYO basic tool kits and adhesives
Wednesday 6 th -  7pm "Be my Valentine" and more $10
Friday 8 th - 7pm "Be my Valentine" and more $10

March  – Please BYO basic tool kits and adhesives
Wednesday 6 th - 7pm "Tri shutter" and Easter $10
Friday 8 th - 7pm "Tri shutter" and Easter $10

April  – Please BYO basic tool kits and adhesives
Friday 12th - 7pm "Mothers Day and more" $10
Wednesday 17 th - 7pm "Mothers Day and more" $10

May  – Please BYO basic tool kits and adhesives
Wednesday 1st - 7pm "To be advised "
Friday 3rd - 7pm "To be advised"
Wednesday 29th - 10am "Childrens holiday class" $10
Friday 31st - 10am "Childrens holiday class" $10

June  – Please BYO basic tool kits and adhesives
Wednesday 12th - 7pm "To be advised"
Friday 14th - 7pm "To be advised"

July  – Please BYO basic tool kits and adhesives
Wednesday 10th - 7pm "Stamp n stack" Christmas in July  $25
Friday 12th - 7pm "Stamp n stack" Christmas in July $25

August  – Please BYO basic tool kits and adhesives
Wednesday 7th - 7pm "Fathers day and more" $10
Friday 9th - 7pm "Fathers day and more" $10

September – Please BYO basic tool kits and adhesive
Wednesday 4th - 7pm "To be advised"
Friday 6th - 7pm "To be advised"
Wednesday 25th - 10am "Childrens holiday class" $10
Friday 27th - 10am "Childrens holiday class" $10

October  – Please BYO basic tool kits and adhesives
Wednesday 9th - 7pm "To be advised"
Friday 11th - 7pm "To be advised"

November  – Please BYO basic tool kits and adhesives
Wednesday 6th- 7pm "Stamp n stack" $25
Friday 8th - 7pm "Stamp n stack" $25

December – Please BYO basic tool kits and adhesives
Lets party while we have fun.
Wednesday 4th - 7pm "Christmas gifts" $20
Friday 6th - 7pm "Christmas gifts" $20
Related Posts Plugin for WordPress, Blogger...