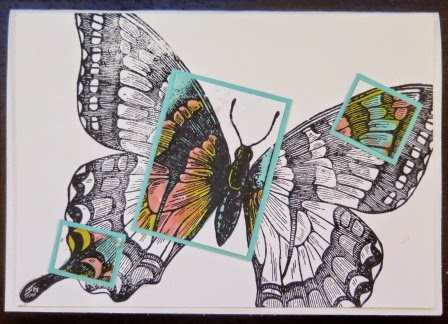
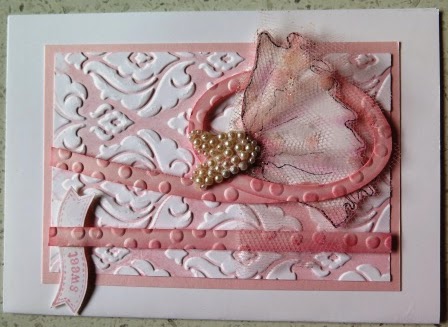
Our last technique class was all about dots. Often we get dot images in our stamp set and they get left, as nobody knows what to do with them. My aim was to get them out and see what we could do with them.
The first was using the Dotty Angles stamp set.
Melon Mambo was stamped on first, then Rich Razzelberry stamped slightly to one side. We then finished it off using another great stamp set called Celebrate Today.
The second card I was going to use Best Day Ever stamp set. I cut up the spots in the set(did I hear a few "oh no's"?)oh yes, I don't have a problem cutting up my stamps, sometimes all I need is a sentiment or an image, so by cutting them up I get the best of both worlds.
The idea I had was to stamp a line of dots then change colour and stamp the rest of the line. Well after thinking about it I realised that it was a good idea for one person but not for a class. So plan B came to fruition. I bought a packet of pencils with rubber tips and used the tips to create the dots.
My Bluecare class also did this technique and one of the residents is wanting to make only Christmas cards, so I adapted the card for him. I quite like how it turned out and so did a few of my friends. They have asked me if we can include that in the Christmas in July class coming up soon.
Finally I pulled out the
Dots & Stripes Decorative Masks and we used a dauber with White ink creating white spots over the Crumb Cake card. We cleaned the mask and then laid it back over the dots then moved it slightly to one side. This created a crescent, we used the dauber with Bermuda Bay and Pumpkin Pie. I really love this technique, what about you?
Search This Blog
Showing posts with label melon mambo. Show all posts
Sunday, July 19, 2015
Thursday, April 9, 2015
Let's start at the very beginning - Day 25
What do you like the best plain and simple or sponged around the edges. Just a little sponge can change the look of your cards. Which one do you like best?
To get the softer look on the randomly stamped flowers, I have stamped off on to a scrap of paper then back on the card. This gives a softer colour.
Let's Start at the Very Beginning links
To get the softer look on the randomly stamped flowers, I have stamped off on to a scrap of paper then back on the card. This gives a softer colour.
Let's Start at the Very Beginning links
Wednesday, April 8, 2015
Let's start at the very beginning - Day 24
Disaster averted!!
I have found my lost card stock and DSP. Yes it was right under my nose as I thought aah!
So get ready to continue on the crafting journey tomorrow, yay. For today I shall just show you some of the cards I have been making lately for my friends parties and classes.
Let's Start at the Very Beginning links
I have found my lost card stock and DSP. Yes it was right under my nose as I thought aah!
So get ready to continue on the crafting journey tomorrow, yay. For today I shall just show you some of the cards I have been making lately for my friends parties and classes.
Let's Start at the Very Beginning links
Tuesday, April 7, 2015
Let's start at the very beginning - Day 23
Disaster has struck!!!
Well maybe not a true disaster but over the Easter weekend I have mislaid my paper and card I was using for these posts. Have you ever put something down and then when you go to pick it up the fairies have taken it, then when you have searched high and low, there is is staring at you. Well that is usually what happens to me but in this case the searching high and low has produced nothing.
As I do not have any more of the Moonlight Designer Series paper stack I am going to have to change the paper I will use. This will not affect what you may be doing if you have bought the stack as the designs are still the same. What do you want to bet that as soon as I have made up the first lot of cards the original DSP turns up.
Look at the amount of cards we have made so far.
Let's Start at the Very Beginning links
Well maybe not a true disaster but over the Easter weekend I have mislaid my paper and card I was using for these posts. Have you ever put something down and then when you go to pick it up the fairies have taken it, then when you have searched high and low, there is is staring at you. Well that is usually what happens to me but in this case the searching high and low has produced nothing.
As I do not have any more of the Moonlight Designer Series paper stack I am going to have to change the paper I will use. This will not affect what you may be doing if you have bought the stack as the designs are still the same. What do you want to bet that as soon as I have made up the first lot of cards the original DSP turns up.
Look at the amount of cards we have made so far.
Let's Start at the Very Beginning links
Sunday, April 5, 2015
Happy Easter my crafting friends
I hope you all had a good Easter break doing what you wanted and got your fill of chocolate. Talking of chocolate what do you think of this cute little Easter basket? I can't take the credit for it, I went to a class put on by a fellow Paper Angel Gaye Schrader and this was one of the projects.
Can you believe it, they had Pink Pirouette shredded paper in the cheap shop that matched the card stock perfectly. The cute bow is made from the new Bow Builder Punch that is fast becoming my second favourite Stampin' Up! tool.
We also made a cute little Easter card and since then I have made a few more using my oval dies.
Can you believe it, they had Pink Pirouette shredded paper in the cheap shop that matched the card stock perfectly. The cute bow is made from the new Bow Builder Punch that is fast becoming my second favourite Stampin' Up! tool.
We also made a cute little Easter card and since then I have made a few more using my oval dies.
Friday, April 3, 2015
Let's start at the very beginning - Day 22
The DSP stack has a variety of designs and colours and as I said in Day 21 this allows you to bring in more colours. The card base is Basic Gray from the Naturals pack and the grid paper DSP is also Basic Gray. The corners were rounded by popping into the Oval punch. Once the image was stamped it was punched out with the Extra large oval punch. Do you see the Pumpkin Pie oval behind the image? I punched out the oval, cut it in half and adhered it to the back of the image making sure it showed a little top and bottom.
The next card I stamped one of the flowers on a piece of DSP and punch it out. I also stamped the flower randomly over the Soft Suede. I adhered a strip of DSP behind the Soft Suede.
This is the last post of Let's start at the very beginning until after Easter. I hope you spend these next few days with family and friends as I will be doing. See you all after Easter with some more ideas.
Let's Start at the Very Beginning links
The next card I stamped one of the flowers on a piece of DSP and punch it out. I also stamped the flower randomly over the Soft Suede. I adhered a strip of DSP behind the Soft Suede.
This is the last post of Let's start at the very beginning until after Easter. I hope you spend these next few days with family and friends as I will be doing. See you all after Easter with some more ideas.
Let's Start at the Very Beginning links
Thursday, April 2, 2015
Let's start at the very beginning - Day 21
Ok back on Day 14 I suggested you needed a few more products one of those was Designer Series Paper
(DSP). These are great little stacks, terrific for the fronts of cards. Now let me show you what we can make out of just a couple of strips.
This first one I have created as a portrait layout. The DSP was cut down and then each end was snipped to create the banner ends. I stamped out the sentiment onto Whisper White card and then punched it out using the Extra large oval punch. The strips and the oval were all raised on dimensionals.
This next one I have created as a landscape layout. The DSP was again cut down
and then each end was snipped to create the banner ends. I stamped out
the sentiment onto Whisper White card and then punched it out using the Extra large oval punch. The strips and the oval were all raised on dimensionals.
I then ramped everything up a bit by sponging around the edge of the white card front and the oval. Pretty cool don't you think?
The stack I chose has other colour families as well as the brights but by using the Naturals card as a base card you now get a few more different colour combinations to your collection.
Check out some of the different stacks at my Online store. Each stack has 48 sheets, 4 each of 12 double-sided designs. 4-1/2" x 6-1/2".
Let's Start at the Very Beginning links
This first one I have created as a portrait layout. The DSP was cut down and then each end was snipped to create the banner ends. I stamped out the sentiment onto Whisper White card and then punched it out using the Extra large oval punch. The strips and the oval were all raised on dimensionals.
I then ramped everything up a bit by sponging around the edge of the white card front and the oval. Pretty cool don't you think?
The stack I chose has other colour families as well as the brights but by using the Naturals card as a base card you now get a few more different colour combinations to your collection.
Check out some of the different stacks at my Online store. Each stack has 48 sheets, 4 each of 12 double-sided designs. 4-1/2" x 6-1/2".
Let's Start at the Very Beginning links
Wednesday, April 1, 2015
Let's start at the very beginning - Day 20
20 days WOW!! I do hope you are enjoying these daily posts. I would love some feedback on what has been the most helpful. Do you feel like you are ready to move on even further, using more tools like punches and what about some ribbon and a bit of bling.
Well they will come so just stay tuned in.
Here are a few of my favourite cards that I have created over the year. Something to give you some inspiration when you feel you are ready to spread your wings.
Let's Start at the Very Beginning links
Well they will come so just stay tuned in.
Here are a few of my favourite cards that I have created over the year. Something to give you some inspiration when you feel you are ready to spread your wings.
Let's Start at the Very Beginning links
Tuesday, March 31, 2015
Let's start at the very beginning - Day 19
Let's take a break from my cards and have a look at a video that Stampin' Up! has put out on masking. I have shown you how to mask with sponging and ripped paper over the last few days, but this is something a bit different. So rather than reinvent the wheel by creating one myself, take a look at this video and be impressed.
Please note that the Blendabilities that are being used in this video have been withdrawn due to manufacturing issues. Also if you want this stamp set then today is the last day to order it. It is a FREE stamp set from Sale a Bration and can only be earned by spending $90. So don't miss out if you want it. Hop on over to my online store and be quick about it.
Let's Start at the Very Beginning links
Please note that the Blendabilities that are being used in this video have been withdrawn due to manufacturing issues. Also if you want this stamp set then today is the last day to order it. It is a FREE stamp set from Sale a Bration and can only be earned by spending $90. So don't miss out if you want it. Hop on over to my online store and be quick about it.
Let's Start at the Very Beginning links
Let's start at the very beginning - Day 18
We did some masking way back on Day 13, now we are going to mask again but this time using a mask that we have created by punching out. Grab yourself a post-it-note and punch the flower. Place over the card front and sponge in all three colours, be careful to not sponge past the post-it-note.
Move the post-it-note to another area and sponge again. I did this randomly over the front of the card.
Now that you have sponged the background, sponge some scraps of Whisper White card in all the three colours, stamp them using your preferred flower, in Soft Suede and punch out. I started out with just 3 but had a slight mishap with ink so had to cover it up hense 2 more sponged and punched out.
What do they say about mistakes...
There is no such think as a mistake just and opportunity for creativity. I hope it worked.
Let's Start at the Very Beginning links
Now that you have sponged the background, sponge some scraps of Whisper White card in all the three colours, stamp them using your preferred flower, in Soft Suede and punch out. I started out with just 3 but had a slight mishap with ink so had to cover it up hense 2 more sponged and punched out.
What do they say about mistakes...
There is no such think as a mistake just and opportunity for creativity. I hope it worked.
Let's Start at the Very Beginning links
Monday, March 30, 2015
Let's start at the very beginning - Day 17
Let us continue on with the fussy cutting and try a new technique to stamp. This technique is called Rock and Roll. Basically you ink up your stamp in one colour and then rock and roll the stamp around another ink pad colour. My only suggestion is to start with a light colour as you don't want to contaminate your ink pad with another colour. I used the Daffodil Delight and rocked it around the Melon Mambo.
The rest of the card is just the same as Day 15 and the Fussy cutting.
Let's Start at the Very Beginning links
The rest of the card is just the same as Day 15 and the Fussy cutting.
Let's Start at the Very Beginning links
Sunday, March 29, 2015
Let's start at the very beginning - Day 16
If you have been following along with me over the last days and haven't yet bought any of the products. Jump in quick if you want some free stuff because it will all be gone on the 31st March. Sadly that is the end of Sale a Bration for another year. This has probably been the best Sale a Bration promotion ever, there has been such a variety to choose from and then more got released and then even more got released.
Let me recap over the products that I have used over the last few weeks.
The very basic kit
Let's Start at the Very Beginning links
Let me recap over the products that I have used over the last few weeks.
The very basic kit
- Snail adhesive $12.00 id#104332
- Stampin' Dimensionals $6.00 id#104430
- A4 Whisper White card stock $15.75 id#106549
- A4 Brights card stock pack $14.00 id#131282
(20 sheets, 2 of each colour) - Soft Suede Ink Pad $11.50 id#126798 (I would choose an extra colour, but we are doing basic)
- Wetlands Stamp Set wood $38.00 id#26695 clear $30.00 id#126697
(if you buy clear, you will need to purchase acrylic block D $14.00 id#118485, I personally like using clear stamps as you can see where you are placing them) - Stampin' sponges $6.00 id#101610
- Neutrals card stock $14.00 id#131283 (20 sheets, 2 of each colour)
- Daffodil Delight Stamp Pad $11.50 id#126944
- Melon Mambo Stamp Pad $11.50 id#126948
- Sassy Salutations Stamp Set Wood $41.95 Clear $33.95 (Unfortunately this lovely stamp set is now retired)
- Flower Shop stamp Set Wood $42.00 Clear $34.00 If you have already got the Acrylic Block D then you are fine.
- Pansy Punch $28.00 id#130698
- Stampin' Trimmer $50.00 id#129722
- Paper Snips $17.00 #id 103579
- Tag Topper Scallop Punch $38.00 #id 133324
- Extra large oval punch $29.95 #id 119859 (Unfortunately this punch is now retired)
- Moonlight Designer Series Paper Stack $11.95 #id133701
Let's Start at the Very Beginning links
Subscribe to:
Posts (Atom)