Search This Blog

Would you like to join Stampin' Up!® - Come join my team, get discounts and make new friends. As long as you are in Australia you can join my team.
Showing posts with label banner. Show all posts

Tuesday, March 31, 2015

Let's start at the very beginning - Day 18

We did some masking way back on Day 13, now we are going to mask again but this time using a mask that we have created by punching out. Grab yourself a post-it-note and punch the flower. Place over the card front and sponge in all three colours, be careful to not sponge past the post-it-note.


Move the post-it-note to another area and sponge again. I did this randomly over the front of the card.

Sponging and masking Let's start at the very beginning sponging zena kennedy independant stampin up demonstrator


sponging zena kennedy independant stampin up demonstrator


Let's start at the very beginning sponging zena kennedy independant stampin up demonstrator


Now that you have sponged the background, sponge some scraps of  Whisper White card in all the three colours, stamp them using your preferred flower, in Soft Suede and punch out. I started out with just 3 but had a slight mishap with ink so had to cover it up hense 2 more sponged and punched out.

What do they say about mistakes...
There is no such think as a mistake just and opportunity for creativity. I hope it worked.

Let's start at the very beginning - Day 18 zena kennedy independant stampin up demonstrator


Let's Start at the Very Beginning links
Day 1 Day 2 Day 3 Day 4 Day 5 Day 6 Day 7 Day 8 Day 9 Day 10 Day 11 Day 12 Day 13
Day 14 Day 15 Day 16 Day 17 Day 18 Day 19 Day 20 Day 21 Day 22 Day 23 Day 24 Day 25 Day 26
Day 27 Day 28 Day 29 Day 30 Day 31 Day 32 Day 33 Day 34 Day 35 Day 36 Day 37 Day 38
Day 39 Day 40

Monday, March 30, 2015

Let's start at the very beginning - Day 17

Let us continue on with the fussy cutting and try a new technique to stamp. This technique is called Rock and Roll. Basically you ink up your stamp in one colour and then rock and roll the stamp around another ink pad colour. My only suggestion is to start with a light colour as you don't want to contaminate your ink pad with another colour. I used the Daffodil Delight and rocked it around the Melon Mambo.

The rest of the card is just the same as Day 15 and the Fussy cutting.


Let's Start at the Very Beginning links
Day 1 Day 2 Day 3 Day 4 Day 5 Day 6 Day 7 Day 8 Day 9 Day 10 Day 11 Day 12 Day 13
Day 14 Day 15 Day 16 Day 17 Day 18 Day 19 Day 20 Day 21 Day 22 Day 23 Day 24 Day 25 Day 26
Day 27 Day 28 Day 29 Day 30 Day 31 Day 32 Day 33 Day 34 Day 35 Day 36 Day 37 Day 38
Day 39 Day 40

Sunday, March 29, 2015

Let's start at the very beginning - Day 16

If you have been following along with me over the last days and haven't yet bought any of the products. Jump in quick if you want some free stuff because it will all be gone on the 31st March. Sadly that is the end of Sale a Bration for another year. This has probably been the best Sale a Bration promotion ever, there has been such a variety to choose from and then more got released and then even more got released.

Zena kennedy independent stampin up demonstrator in Australia
 Let me recap over the products that I have used over the last few weeks.

 The very basic kit
  • Snail adhesive $12.00  id#104332
  • Stampin' Dimensionals $6.00  id#104430
  • A4 Whisper White card stock $15.75  id#106549
  • A4 Brights card stock pack $14.00  id#131282
    (20 sheets, 2 of each colour)
  • Soft Suede Ink Pad $11.50  id#126798 (I would choose an extra colour, but we are doing basic)
  • Wetlands Stamp Set wood $38.00 id#26695  clear $30.00 id#126697
    (if you buy clear, you will need to purchase acrylic block D $14.00  id#118485, I personally like using clear stamps as you can see where you are placing them)
  • Stampin' sponges $6.00 id#101610
then to progress a little further
  • Neutrals card stock $14.00   id#131283 (20 sheets, 2 of each colour)
  • Daffodil Delight Stamp Pad  $11.50 id#126944
  • Melon Mambo Stamp Pad $11.50 id#126948
  • Sassy Salutations Stamp Set Wood $41.95 Clear $33.95 (Unfortunately this lovely stamp set is now retired)
  • Flower Shop stamp Set  Wood $42.00 Clear  $34.00 If you have already got the Acrylic Block D then you are fine.
  • Pansy Punch $28.00 id#130698
  • Stampin' Trimmer $50.00                                                                                                                                                       id#129722
 and finally
  • Paper Snips $17.00 #id 103579
  • Tag Topper Scallop Punch $38.00 #id 133324
  • Extra large oval punch $29.95 #id 119859 (Unfortunately this punch is now retired)
  • Moonlight Designer Series Paper Stack $11.95 #id133701
If you are keen to get started and need a little incentive then now is the time. For every $90 spent you receive a FREE Sale a Bration item. Check them out here. You may order through my Online store or email me and place an order that way. Also if you just want to know something about what you have been following I am happy to answer any questions.


Let's Start at the Very Beginning links
Day 1 Day 2 Day 3 Day 4 Day 5 Day 6 Day 7 Day 8 Day 9 Day 10 Day 11 Day 12 Day 13
Day 14 Day 15 Day 16 Day 17 Day 18 Day 19 Day 20 Day 21 Day 22 Day 23 Day 24 Day 25 Day 26
Day 27 Day 28 Day 29 Day 30 Day 31 Day 32 Day 33 Day 34 Day 35 Day 36 Day 37 Day 38
Day 39 Day 40

Saturday, March 28, 2015

Let's start at the very beginning - Day 15

Fussy cutting!

What are you talking about?

We see it all over the web but what is it? It is simply using a very sharp pair of scissors and cutting closely around the edge of an image or a piece of fabric. With Stampin' Ups paper snips, fussy cutting is very easy and the results can make a beautiful embellishment to a card or scrapbook page. Even artwork can have elements that are fussy cut. I created this canvas for a special display recently. The leaves and the trees were fussy cut.

Let's start at the very beginning - Day 15 Fussy cut canvas Zena Kennedy Independent Stampin Up demonstrator

With your new stamps and snips I will show you how to create a lovely card that anyone would be happy to receive.

Let's start at the very beginning - Day 15 Zena Kennedy Independent Stampin Up demonstrator

Firstly draw a fine curving pencil line to be a guide as you stamp.


Stamp along this guide line, some of the petals should extend over the line to add a bit of interest.

Let's start at the very beginning - Day 15 Fussy cut  Zena Kennedy Independent Stampin Up demonstrator

Now is time to fussy cut. Cut around the petals leaving a small edge of white.


Stamp a few flowers on the Whisper White card scrap and punch them out. These are then added to the card with dimensionals. Stamp a sentiment and there you have a lovely card to add to your collection and now you now how easy it is to fussy cut.

Let's start at the very beginning - Day 15 Zena Kennedy Independent Stampin Up demonstrator


Let's Start at the Very Beginning links
Day 1 Day 2 Day 3 Day 4 Day 5 Day 6 Day 7 Day 8 Day 9 Day 10 Day 11 Day 12 Day 13
Day 14 Day 15 Day 16 Day 17 Day 18 Day 19 Day 20 Day 21 Day 22 Day 23 Day 24 Day 25 Day 26
Day 27 Day 28 Day 29 Day 30 Day 31 Day 32 Day 33 Day 34 Day 35 Day 36 Day 37 Day 38
Day 39 Day 40

Thursday, March 26, 2015

Let's start at the very beginning - Day 14

The next few days will be used to prepare more cards for you and it will also give you a chance to order more product if you are following along with me. It is time to invest in a really good pair of Paper Snips and Stampin' Up! has that covered.

I think it is now time to get a couple more punches and over the next few days I will be preparing samples using the items I am now suggesting.

  • Paper Snips $17.00 #id 103579
  • Tag Topper Scallop Punch $38.00 #id 133324
  • Extra large oval punch $29.95 #id 119859 (Sadly this punch is retired)
  • Moonlight Designer Series Paper Stack $11.95 #id133701
We are now going to get you started with some Designer Series Paper (DSP). These are great little stacks, terrific for the fronts of cards. Each stack has 48 sheets, 4 each of 12 double-sided designs. 4-1/2" x 6-1/2".
Built for Free Using: My Stampin Blog


Let's Start at the Very Beginning links
Day 1 Day 2 Day 3 Day 4 Day 5 Day 6 Day 7 Day 8 Day 9 Day 10 Day 11 Day 12 Day 13
Day 14 Day 15 Day 16 Day 17 Day 18 Day 19 Day 20 Day 21 Day 22 Day 23 Day 24 Day 25 Day 26
Day 27 Day 28 Day 29 Day 30 Day 31 Day 32 Day 33 Day 34 Day 35 Day 36 Day 37 Day 38
Day 39 Day 40

Wednesday, March 25, 2015

Let's start at the very beginning - Day 13

Are you ready to bring out the artist in you?  Oh yes everyone is artistic it sometimes just needs a little nudge. I will walk you through creating a card using the Masking Technique.
Use an A5 piece of Very Vanilla card stock folded it in half ready for the masking.
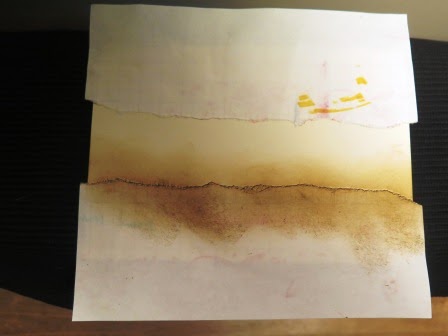
Grab a piece of copy paper a little larger than the card, rip it in half and temporarily adhere it to the Very Vanilla. (It needs to stay put while you are sponging).
Start sponging in a circular motion with the Soft Suede, change to the Melon Mambo and sponge the top. Fill in the centre with the Daffodil Delight.
When you are happy with the sponging, pull off the masking paper and look at your beautiful Work of Art.
Stamp the images with Soft Suede and also the sentiment.

See I told you, a little nudge brings out the artist. Now what else can you do with masking and sponging?


Rip in half and adhere to card zena kennedy independant stampin up demonstrator
Rip it in half and temporarily adhere it to the Very Vanilla


Sponge Soft Suede zena kennedy independant stampin up demonstrator
Sponge in a circular motion with the Soft Suede


Sponge the Melon Mambo zena kennedy independant stampin up demonstrator
Sponge the top with Melon Mambo


Fill in the Daffodil Delight zena kennedy independant stampin up demonstrator
Fill in the centre with the Daffodil Delight


Remove the masking zena kennedy independant stampin up demonstrator
Remove the masking paper

All finished ready to stamp zena kennedy independant stampin up demonstrator
Remove all the masking paper ready for stamping.

Finished and stamped zena kennedy independant stampin up demonstrator


Let's Start at the Very Beginning links
Day 1 Day 2 Day 3 Day 4 Day 5 Day 6 Day 7 Day 8 Day 9 Day 10 Day 11 Day 12 Day 13
Day 14 Day 15 Day 16 Day 17 Day 18 Day 19 Day 20 Day 21 Day 22 Day 23 Day 24 Day 25 Day 26
Day 27 Day 28 Day 29 Day 30 Day 31 Day 32 Day 33 Day 34 Day 35 Day 36 Day 37 Day 38
Day 39 Day 40

Monday, March 23, 2015

Let's start at the very beginning - Day 11

Let's bring in some colour by sponging. I have created these flowers by sponging Whisper White card with Daffodil Delight, Melon Mambo and Soft Suede. I then stamped the flowers using Soft Suede. The base card is Soft Suede. Who would have thought you could make such a pretty card with only three colours.

Day 11 zena kennedy independant stampin up demonstrator Let's start at the very beginning Day 11 zena kennedy independant stampin up demonstrator


Let's Start at the Very Beginning links
Day 1 Day 2 Day 3 Day 4 Day 5 Day 6 Day 7 Day 8 Day 9 Day 10 Day 11 Day 12 Day 13
Day 14 Day 15 Day 16 Day 17 Day 18 Day 19 Day 20 Day 21 Day 22 Day 23 Day 24 Day 25 Day 26
Day 27 Day 28 Day 29 Day 30 Day 31 Day 32 Day 33 Day 34 Day 35 Day 36 Day 37 Day 38
Day 39 Day 40

Sunday, March 22, 2015

Let's start at the very beginning - Day 10

I know it is easy to use a ruler and pencil to mark your cutting lines and then to cut everything out with scissors. How much easier would it be to use a good quality cutter.

I would like to suggest you invest in a Stampin' Up! trimmer. It is the cutting and scoring tool made with crafters in mind!  Cut anywhere, in any direction. Full 12" cut or score. You can also keep the scoring and cutting blades on the track at the same time. I love this as it makes scoring the card so quick and easy. It also has a compartment under the base to store blades, scoring stylus, etc! The cost of the Stampin' Trimmer is only $50.00, a very good investment.

Yesterday I showed you how to punch out and raise up the flower. Lets not stop there, instead of stamping on the base card, especially if it is coloured. Stamp the sentiment and cut the ends to form a banner, then raise up with dimensionals.

Let's start at the very beginning raised on dimensionals zena kennedy independent stampin up demonstrator Let's start at the very beginning raised on dimensionals zena kennedy independent stampin up demonstrator


Let's Start at the Very Beginning links
Day 1 Day 2 Day 3 Day 4 Day 5 Day 6 Day 7 Day 8 Day 9 Day 10 Day 11 Day 12 Day 13
Day 14 Day 15 Day 16 Day 17 Day 18 Day 19 Day 20 Day 21 Day 22 Day 23 Day 24 Day 25 Day 26
Day 27 Day 28 Day 29 Day 30 Day 31 Day 32 Day 33 Day 34 Day 35 Day 36 Day 37 Day 38
Day 39 Day 40

Saturday, March 21, 2015

Let's start at the very beginning - Day 9

Before we get started, here are two little tips for you.
1. Put a mark on the petal that matches the lower petal on the punch. This way when you stamp you can make sure that the marked petal is at the edge of the card, then when you slide the punch in you match them up easily.
2. Hold the punch upside down when using it. This way you can see what you are punching and lining it up will be easy.

Let's start at the very beginning - Day 9 marking the punch zena kennedy independent stampin up demonstrator
Mark this petal
Let's start at the very beginning - marking the stamps zena kennedy independent stampin up demonstrator
Mark the matching petal on each stamp
Let's start at the very beginning - Day 9 zena kennedy independent stampin up demonstrator
This one is easy as you just have to remember to put this pattern on the edge

Now we have our punch and stamps marked let's see some cards. This card is the same as you saw on Day 8 but this time I have punched the flower out and raised it up with dimensionals.


The square of card has been sponged around the edge in the matching ink.


Let's Start at the Very Beginning links
Day 1 Day 2 Day 3 Day 4 Day 5 Day 6 Day 7 Day 8 Day 9 Day 10 Day 11 Day 12 Day 13
Day 14 Day 15 Day 16 Day 17 Day 18 Day 19 Day 20 Day 21 Day 22 Day 23 Day 24 Day 25 Day 26
Day 27 Day 28 Day 29 Day 30 Day 31 Day 32 Day 33 Day 34 Day 35 Day 36 Day 37 Day 38
Day 39 Day 40

Friday, March 20, 2015

Let's start at the very beginning - Day 8

We have now been through
  • where to start ✔
  • how to gather a starter kit together ✔
  • what to do with this kit ✔
So now we look at
  • what I need next
  • where to from here
Now if you are to progress any further it is time to buy some more products. Here are my suggestions.
  • Neutrals card stock $14.00  id#131283 (20 sheets, 2 of each colour)
  • Daffodil Delight Stamp Pad  $11.50  id#126944
  • Melon Mambo Stamp Pad $11.50  id#126948 
  • Sassy Salutations Stamp Set Wood $41.95 Clear $33.95 (You will need to purchase Acrylic block H $14.00 id#118490. I prefer clear so that I can see the placement of the sentiment)
  • Flower Shop stamp Set  Wood $42.00 Clear  $34.00 If you have already got the Acrylic Block D then you are fine.
  • Pansy Punch $28.00  id#130698
 Don't forget if you purchase all this before the 31st March you will receive one of the our Sale a Bration Freebies

So let's get started on some more cards. Here is a couple to tide you over until tomorrow.

Let's start at the very beginning day 8 zena kennedy independant stampin up demonstrator, Let's start at the very beginning daffodil delight zena kennedy independant stampin up demonstrator,


Let's Start at the Very Beginning links
Day 1 Day 2 Day 3 Day 4 Day 5 Day 6 Day 7 Day 8 Day 9 Day 10 Day 11 Day 12 Day 13
Day 14 Day 15 Day 16 Day 17 Day 18 Day 19 Day 20 Day 21 Day 22 Day 23 Day 24 Day 25 Day 26
Day 27 Day 28 Day 29 Day 30 Day 31 Day 32 Day 33 Day 34 Day 35 Day 36 Day 37 Day 38
Day 39 Day 40

Related Posts Plugin for WordPress, Blogger...