Search This Blog

Would you like to join Stampin' Up!® - Come join my team, get discounts and make new friends. As long as you are in Australia you can join my team.

Monday, November 26, 2012

Surfie girl

My friend asked me to make a 21st birthday card for her daughter. She wanted something beachy as she is always at the beach surfing. This is what I came up with.
I sanded back some Early Expresso Coordinations to make it look very, very rough. Of course I had to try some more brayering. I made the sun by masking after I had brayered a layer of Daffodill Delight. I then covered the sun and brayered the sky. The water was created by wrapping cotton around the brayer and then loading up with Indigo Blue. I ran it over scrap paper a few times to weaken the strength.The sand was squiggled with the White gel pen along the water's edge.
Next came my little surfer girl. She was made with White gloss card and I brayered it with Pink Pirouette. The surf board was brayered by masking one side and then brayering with Summer Starfruit. I then masked that side and brayered the other side with Primrose Petals. Her hair was cut from sanded Early Expresso coordinations card.


This is what she finally looked like minus the 21 that I added and forgot to photograph. Do you recon she will like it?

Thursday, November 22, 2012

My ladies with brayered background

Now for a couple of ladies.  I found this great calendar with heaps of Art Deco style ladies. So that was my inspiration for this first card.

The background was done in sections as I wanted a night sky, water and land.
The sky was brayered in layers starting from the lightest to the darkest.
The water was done by wrapping fine cotton around the brayer and then loading with ink. I ran it off on scrap paper to make it less intense. I made a few squiggles with white gel pen to make it look like ripples on the water.
The land was brayered in layers the same as the sky but using the earthy colours.
The bridge is the Scallop Trim Border punch which I snipped into at each scallop.

The next card was very simple. The background was created by brayering bubble wrap and then laying the gloss card on top. I put scrap paper over and then brayered over. My lady was drawn with a fine black permanent marker on to yellow tinted acetate. I then cut it out and pasted it on to the card.  See as I said simple.

Wednesday, November 21, 2012

More brayer techniques

Here we are with a few more cards using the brayer.

Gloss card brayered with Calypso Coral.
Then brayered from each corner with Old Olive.


Brayer was wrapped in cotton and then loaded with Midnight Muse.
Then brayered over Whisper White card.

Background brayered with Summer Starfruit.
Then masked with ripped post it notes.
Then brayerd with Cajun Craze.
Background brayered and masked.
The top was then bounced with the brayer.
 

Tuesday, November 20, 2012

Brayer techniques

As promised here are a few cards I made for our Heartfelt Event.
The first few were all done by brayering in layers of ink starting from the lightest to the darkest.


Card: Cajun Craze, Whisper White, White Glossy, Wild Wasabi, Perfect Plum, Always Artichoke, Festival of Prints DSP
Stamps: Come to Bethlehem, Friendly Phrases, Dinoroar, Silhouette Sentiments
Ink: Calypso Coral, Cajun Craze, Certainly Celery, Lucky Limade, Gumball Green, Black Stazon, Wisteria Wonder, Perfect Plum, Daffodill Delight, Old Olive, Versamark, Primrose Petals

Stay tuned I will post more tomorrow.

Monday, November 19, 2012

Please meet my friend ....

The Brayer....
My newest favourite Stampin Up tool. On Saturday I was one of the Demonstrators who manned the brayer table on Product Playground at our Brisbane Stampin Up Heartfelt Event. Because of this opportunity I have come up with so many different ways to use the brayer I decided to make up a Brayer Sample book. Here are a few pages...
Background using ink refills dropped on to acetate and brayered. Then place gloss card face down and brayer

Ink refills dropped on card, fine cotton wrapped around brayer and glad wrap wrapped around brayer

Background is various thicknesses of cotton wrapped around brayer, masking, ink refills spritzed on card and brayered
Using the embossing folder with white craft ink and dazzling diamonds.

Background bleached bubblewrap and felt snowflakes dipped in bleach and brayered. Resist with clear gloss and versamark

Top background is brayered ink, spritzed and rock salt left to dry. Bottom background dark card brayered with white for misty look. Brayered and sanded, wax paper scrunched and ironed and brayered

Top background dark card brayered with string and then stamped with bleach. Bottom layer brayered in a frame Brayered and embossed stripes and tartan..

Background ink refills dropped on to acetate, spritzed and brayered, then gloss card placed face down and brayered.

I would like to share this sample book with all my Paper Angels Team as I think it would be a great training tool for new brayer users. Just ask me if you would like to borrow it for a class.

Oh just remembered..... please make sure when storing your brayer that you rest it on it's back.

Sunday, November 18, 2012

While storms raged outside...

Just beat the heavens opening up thank goodness. What a terrific storm the trees were bent to near breaking point. AND all the while all the Stampin Up Demonstrators and their friends were safe inside the Convention Centre creating a storm of their own with card, ink, stamps, big shots, brayers etc. It was Brisbanes turn for the Heartfelt Event and I was very proud to be one of the demonstrators in the Product Playground area. Anna Wheaton, Genelle Little and myself were on the Brayer table. What is a Brayer you are all asking? Well it is now fast becoming one of my favourite tools. If you have been following my blog for a while you will realise I am a little bit arty farty and the brayer has just given me another tool to play ladies with. Although I did actually do a few cards without my ladies. I'll post some of them in the next few days.
So here's a breakdown of the day......

Arrived at the Convention Centre and set up the Brayer display boards and sorted out what we were all doing.
The doors opened at 10am and then the fun began. I was first up on the table and introduced some demonstrators into a brand new world of fun and creativity. Many had bought brayers and now really experimented. (This is yet another of the things I like about Stampin Up. Product Playground lets you play with the product and learn how to use it). I have a feeling that there might be a few brayered cards making their way into homes this christmas.

12.30pm Anna took over and I had a very quick lunch before heading off to the Handmade gifts presentation by Ruth Clarke. She came up with some innovate ways to create easy and beautiful gifts out of our yummy fabric. I think a few of my dear friends may be getting some of these for pressies in  the near future.

Next I did a quick dash around the display area and took a few pics of all the lovely displays. No time to dilly dally though as it was then into another presentation by Sophie Zadeh on Decorations. Oh my goodness is all I can say. I wanted to go home and play straight away. Stay tuned as I will be posting photos of her decorations shortly.
By this time it was 2.30pm and I'm thinking, where has the day gone and will I cover everything? Had a quick cup of coffee to recharge the batteries and then off to the greatest presentation by Liz Collett.
Now I know I could be a bit biased as Liz is my upline but she had the most awesome Gingerbread house cards and her Wish jar was so innovative and I love how she created cards out of the Simply Scrappin Kits. She just blows me away with her creativity. I am so glad I am part of her team.
Straight after Liz was a presentation by Kirsty Brown, what a wag she is. I love her sense of humour. She came up with some great ways of decorating and packaging.
The brown paper that comes in all our deliveries got well used with wrapping gifts and then decorating with fab bows.
Phew! Have I got time for a wee break? Nuh. Gotta check out the Demonstration booths that are spread around the main room. Madonna Dunn had some different ways on using our markers. Kim Gavarra got me excited with our watercoulour crayons on fabric. That is a must try.
Oh I nearly forgot, I made a decoration to put on the tree and received a free gift for doing so. How good is that?. Running out of time so looks like the make and takes that we all received will be done at home. Had to go pack up the brayer table with the others and say goodbye to my new found friends. Then home, once again beating the storm. Thunder and lightning and torrential rain sent us to bed early making sure we pulled out all the power leads from the appliances. Ahhh what a day.

Saturday, November 3, 2012

Loving the Big Shot

The Big Shot is such a great machine. I find I am using it more and more with my projects. Gosh and to think that I once said I would never need this machine.
I was asked by a friend to make a book for her sons 21st birthday. She wanted something that all the guests could sign. I had forgotten that I took photos of this book until I downloaded my camera today. So pleased I did as it is always good to look back on what projects one does.
So here are the pics and a description on the pages......

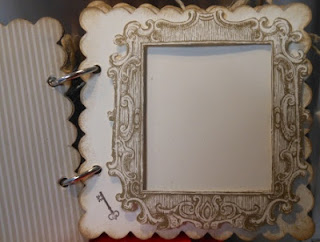
I used some very thick craft board that I had put away "Just in Case" I could use it one day. I glued Very Vanilla card to both sides of it and then ran it through the big shot with the Scallop  Square die. I found a Celtic type cross online, so printed it off and cut it out so that I could make a mask. I sponged randomly over the page, spritzed all over, then removed the mask and spritzed a little more. I then covered it all in Versamark and clear embossing powder and heat embossed it.
For the back I prepared it the same way but instead of the Celtric Cross I cut out a 21 and stamped some keys.

All the other pages were covered with DSP. I cut out a frame from the now retired Beau Chateau DSP.
I made secret pockets and lots of tags that could be written on. The other DSP I used was the Neutrals Pattern Designer Series.
All the edges of the pages were sponged and then the pages were held together with rings.
I decorated the rings with bits of ribbon, string and a key. 


Thursday, October 11, 2012

So busy..

Have you missed me? I have been so busy these last few weeks. Only 4 more days and I can breathe a sigh of relief. WHY?
Quota's annual charity Craft and Gift Fair will be over. This will be eight years of organising a very fun fair.
Here is a little background on how this event came about.
Eight years ago my friend Janette and I had spent a very slow, hot, day trying to sell raffle tickets for our club Quota International of Carindale. By the end of the day we realised that people are so sick of putting their hands in their pockets for charities.
So over a cup of coffee we decided there must be a better way to make money for our charities that appeal to the public. I had just been to a craft fair and suggested we should do something like that. So it was decided that this is what we would try. We booked a room at the Carina Leagues Club and managed to gather together a very talented group of stall holders.
The day went well and we made $500.  So much more fun than selling raffle tickets. All the money went to Aspergers Syndrome and Clef Pals. We decided this would be an annual event, held at the same time each year. Last year was our best ever we raised $4000, so we are looking to top that this year.


Click on image to enlarge


Janette and I posing for a photo shoot for the local paper  
Now you may hear Janette and I talk about Quota this and Quota that. Even though everyone has heard of Rotary and Lions nobody seems to know much about Quota.

Here is a little overview of what Quota is all about.

Quota International of Carindale is a service organization whose focus is to assist the Speech and Hearing Impaired and address the needs of Disadvantaged Women and Children. Quota International was one of the first professional women’s organisations founded in the United States. Our club also participates at an international level by financially supporting worthy projects, such as the Quota house for destitute women and children in New Delhi, India. To find out the full story of Quota check out their website.

Check out the workshops we have on offer this Sunday at the Carina Bowls Club.
So if you have nothing to do on Sunday 14 October, come along to the Carina Bowls Club and make a day of it. You will also be supporting two very worthy causes.

Friday, September 28, 2012

What a great day

My day was so full today and now I am so exhausted I can't even drag myself off to bed. BUT what a great day. Started off with a ladies class this morning and made a couple of nice cards. Then a quick lunch and tidy up for the Children's class. Then worked on the Craft and Gift Fair we are  organising for October. Phew can someone carry me to bed.


These are a couple of the cards we made this morning. Really great what you can do with the leftover scraps of DSP. I think I will make a pack of these and use up all my offcuts. Just another reason why Stampin Up card is so good to use, it all coordinates!

The children's class was fun fun fun. We started out with this cute butterfly card and as there was a boy attending he used the dinosaur stamp set.


Then we moved on to another butterfly card and of course another dinosaur card.
I was holding back on the fun one for the last card and WOW were they thrilled with it. This little owl was created between peals of laughter as they added funny cross eyes and raised eyebrows. The children are so creative. I love how they put their own personality into the cards.

Here are two of the little munchkins proudly showing off their masterpieces, they sure look happy with them. Not sure what his mother will think of this photo, it's one of his favourite poses.
Oops I forgot to tell you what I used

Cardstock:  Pacific Point, Crumb Cake,Early Expresso, Whisper White, Certainly Celery, First Edition Specialty Paper, Always Artichoke, Very Vanilla, Midnight Muse, Gumball Green, Summer Starfruit, Calypso Coral
Ink: Early Expresso, Marina Mist, Gumball Green, Perfect Plum, So Safron, Wild Wasabi, Pink Pirouette, Bashful Blue
Stamp sets: Dinoroar, Papillion Potpourri
Accessories: Fancy Fan embossing folder, Manhattan Flower embossing folder, organza ribbon
Punches: Postage Stamp, 1" Square punch, Butterfly, Heart to heart,  Small heart,   Build a bird, Curly label
 .

Tuesday, September 25, 2012

Childrens classes

There is only one spot left for the Childrens class on Wednesday 26 September. Don't panic though there is still a few spaces on the following Wednesday.
Here are the details for these fun afternoons.
When:
Wednesday 26 September 2 to 4pm
Wednesday 3 October 2 to 4pm
Where:
My place 13 Rosella Street Wellington Point
Cost:
$10 for one child and $7.50 for a sibling

So if you are wondering what the kids can do over the school holidays why not send them along for some creativity, fun and friendship. Each child will take home 3 projects.

Saturday, September 22, 2012

Please comment...

Good evening all. I have been told that people are unable to comment on my blog:(
Soooo could some of my regular followers or maybe a newbie comment on this post just so I know that it is all working OK.

Now I couldn't just post without sharing something and since I haven't taken any photos of my latest cards I thought I would post something very special. My dear husband (Poppa) and my very dear grandson (James).
Poppa made the castle for James's birthday and I painted it. He is very proud of it and all his friends love playing knights and recon he is lucky to have such a great Poppa.  I think he is too.

Thursday, September 20, 2012

Card#5

Oops sorry I thought I had posted this.
Well this is the last of my top 5 favourites from the new catalogue. There were so many to choose from and of course I don't have them all yet. My wish list gets longer by the day. Why not organise a workshop with a few friends and I can show you all the great projects I have been working on so far.

This card was made from the new Coordinations cardstock. It has a different coloured core, so on sanding it back you get a different coloured layer. Using it with the new Woodgrain embossing folder it gives a really life like look of tree bark.

This is a cute little card as it is folded in an uneven gate fold and the Owl sits over the opening and is held together with a scallop oval. Gee I didn't explain that very well. Sorry!! I hope the picture below shows it better than I described it.

I sponged the Pacific Point circle to make it look like the sky behind him.

I hope you enjoyed my top five. 

Stay tuned as I am going to be holding a couple of childrens workshops over the school holidays, so if you are interested email me or phone to book in.

ALSO don't forget if you want to take part in the Paper Angels Christmas Card Workshop you will need to book in soon as some of the venues are already full.

Cardstock: Coordinations Early Expresso, So Safron, Pacific Point, Crumb Cake,Early Expresso, Whisper White, Chocolate Chip
Ink: Pacific Point
Stamp sets: Little friends
Punches: Build a bird, Owl punch,13/4" scallop circle, 11/4"circle, word window, decorative label
Accessories: Woodgrain embossing folder

Friday, September 14, 2012

Card #4

Mmmnn I keep using the Blossom punch, I wonder if I could class this as one of my favourites now! Actually I used a few punches in this card. The ornament punch made the leaves. Can you work out the others?
The Summer Smooches DSP is pretty cool, I think it might find it's way to my little ladies, you'll just have to stay tuned.
I embossed the Whisper White card with  the new Adorning Accents embossing folder. All the punched edges were sponged to give each layer a bit of depth. Such a quick and simple card.


Cardstock: Island Indigo, Old Olive, Tangerine Tango, Whisper White
Smooches Designer Series Paper
Ink: Island Indigo
Accessories: Basic Rhinestone Jewels
Stamp sets: Elements of Style
Punches: Blossom punch, 13/4" circle punch, Triple-Layer flower punch , Itty Bitty Shapes punch pack, Ornament punch

Thursday, September 13, 2012

Groovy baby....

I was asked to make another of my little ladies. This one is for a young lady turning 17. Her aunty asked if it could be something groovy like my other birthday lady. Well not wanting to make exactly the same card again I pulled out all my Designer Series Paper till I found one that got my brain a churning.
I drew my girl up, sponged around her and then dressed her in the groovy (retired) DSP. Then I cut her hair out of the new Coordinations card stock in Early Expresso and then ran it through the woodgrain embossing folder.
The stack of pressies was made using Melon Mambo card embossed and glittered, Pool Party and So Saffron. I cut the 17 free hand.


Don't you just love her groovy shoes, they were a little tricky to cut out but worth all my breath holding.

Her sunnies were made using Acetate coloured with a red felt pen and then rubbed off to just leave a stain. I then punched them out with the Owl punch and set them up with Glue dots.
The background is supposed to resemble a Disco with dripping lights and kooky lanterns. Do you think I achieved that?


Cardstock: Melon Mambo, So Safron, Pool Party, Early Expresso, Skin Tone
Ink: Pretty in Pink
Accessories: Pink Seam binding ribbon, Basic Rhinestone Jewel, Stripes embossing folder, Square Lattice embossing folder

Related Posts Plugin for WordPress, Blogger...