Search This Blog

Would you like to join Stampin' Up!® - Come join my team, get discounts and make new friends. As long as you are in Australia you can join my team.
Showing posts with label old olive. Show all posts

Monday, December 28, 2015

Garden in Bloom cards

Grow a flower patch with stamps, ink, and paper. Add encouraging sentiments. Then share with the people in your life.
Use just the outline stamp or the solid stamp, or use them both together for more creative combinations.


Garden in Bloom cards Zena Kennedy independent stampin up demonstrator
Take a look at page 119 of the Catalogue.

If this is something that you would like to replicate, contact me or place an order online for the stamp set and any of the other products you will need to complete these cards. Below is a list of some of the products you will need.

Monday, March 16, 2015

Let's start at the very beginning - Day 4

Did you know that for every $90 you spend on products you will receive a FREE product. If you haven't bought your starter kit suggestions yet then now until the 31st March would be a good time. The 31st March is the last day of Sale a Bration and then all the FREE products are gone for another year.

Now  let me show you what I made today with the stamp set. The first card, I used Melon Mambo as my base card. I then stamped some images out on the Whisper white card and cut them out as a square. I cut out a Whisper White square just a touch bigger as a mat. I raised both these layers with dimensionals. It could also look good if you used Melon Mambo as the mat.

The second card is another male card although I would be happy to receive it. The base card was Tangerine Tango, next layer was Tempting Turquoise, next layer was Old Olive. I stamped two of the images on to Whisper White and glued to Old Olive mat, then I stamped the duck again and cut it out. The duck was then raised up with dimensionals and stuck on to the stamped duck. The colour layering carried through to the sentiment. Don't be scared to try colours together you might be pleasantly surprised.

Let's start at the very beginning zena kennedy independent stampin up demonstrator layers of card zena kennedy independent stampin up demonstrator


Let's Start at the Very Beginning links
Day 1 Day 2 Day 3 Day 4 Day 5 Day 6 Day 7 Day 8 Day 9 Day 10 Day 11 Day 12 Day 13
Day 14 Day 15 Day 16 Day 17 Day 18 Day 19 Day 20 Day 21 Day 22 Day 23 Day 24 Day 25 Day 26
Day 27 Day 28 Day 29 Day 30 Day 31 Day 32 Day 33 Day 34 Day 35 Day 36 Day 37 Day 38
Day 39 Day 40

Sunday, March 15, 2015

Let's start at the very beginning - Day 3

Have you been playing?
I hope so. Let us have a look at a couple of more layouts. This time we are using Whisper White base, and using all the images on an Old Olive layer. Each panel is raised up on dimensionals. The second card uses only one of the images and the sentiment is stamped straight onto the base card.


Why not try putting both the images together. Stamp a sentiment and use a colour from your pack. Use dimensionals to raise this layer up from the Whisper White base card.


Let's Start at the Very Beginning links
Day 1 Day 2 Day 3 Day 4 Day 5 Day 6 Day 7 Day 8 Day 9 Day 10 Day 11 Day 12 Day 13
Day 14 Day 15 Day 16 Day 17 Day 18 Day 19 Day 20 Day 21 Day 22 Day 23 Day 24 Day 25 Day 26
Day 27 Day 28 Day 29 Day 30 Day 31 Day 32 Day 33 Day 34 Day 35 Day 36 Day 37 Day 38
Day 39 Day 40

Saturday, March 14, 2015

Let's start at the very beginning - Day 2

So let us see just how easy it can be to produce some beautiful cards using all your starter kit supplies.
Yesterday  you saw these two cards. The Old Olive card has a stamped layer and then the sentiment has been matted on to a piece of Old Olive and raised with Dimensionals. The Whisper White is just a reverse with the addition of an Olive Green layer. Same design, different layout and colour, pretty easy don't you think?

Old Olive base Let's start at the very beginning zena kennedy independent stampin up demonstrator Day 1 Let's start at the very beginning zena kennedy independent stampin up demonstrator

Male card zena kennedy independent stampin up demonstrator Pacific Point base zena kennedy independent stampin up demonstrator

Now let us try another layout. This one would make a nice male birthday card. The first one is using Whisper White card as the base and then pacific Point card as the mat layer behind the stamped images. The second one is using the Pacific Point card as the base and then the stamped layer.

So what do you think? Change the base card and you change the entire look of the card.

Whisper white base zena kennedy independent stampin up demonstrator Let's start at the very beginning zena kennedy independent stampin up demonstrator


Let's Start at the Very Beginning links
Day 1 Day 2 Day 3 Day 4 Day 5 Day 6 Day 7 Day 8 Day 9 Day 10 Day 11 Day 12 Day 13
Day 14 Day 15 Day 16 Day 17 Day 18 Day 19 Day 20 Day 21 Day 22 Day 23 Day 24 Day 25 Day 26
Day 27 Day 28 Day 29 Day 30 Day 31 Day 32 Day 33 Day 34 Day 35 Day 36 Day 37 Day 38
Day 39 Day 40

Saturday, February 16, 2013

On a roll

Well I had a productive day today. I finished creating the 3 cards for my next stamp class in March and have even written instructions for 2 of them with pictures. So make sure you keep either Wednesday 6th or Friday 8th free and come along for a big night.

I then wanted to stock up on some cards so here they are.

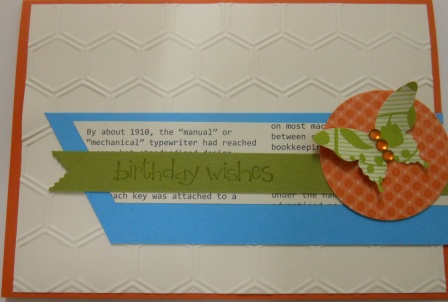
The first one was CASED but I don't know who from. If you recognise your work thank you for the inspiration. I used Tangerine Tango card and teamed it with Very Vanilla, Tempting Turquoise and Old Olive. Don't you just love the Colour Coach for helping you put colours together? I sat the Elegant Butterfly Punch on a 23/4 inch DSP circle. The Birthday sentiment is from an old SAB set called So Happy for You. I keep dragging it out as I love the font.
This one I had to really scramble to get things to work. I thought I had Pool Party ribbon but I must have used it all, so I got my Very Vanilla Seam binding ribbon and dragged it through the Pool Party stamp pad. Yuk, that looked dreadful it didn't look at all like Pool Party. So I decided to wash it out and "what do ya know" it came out this nice Pool Party colour. Yipee... I then wanted it to look scrunchy so I squeezed it up and then put the heat gun on it to dry it out and set the creases. I stamped the Happy Birthday sentiment with Versamark and embossed it with White embossing powder. I then used a paint dauber and Pool Party ink to colour over the card. I rubbed the ink off the embossing with a tissue to make it pop.

My last card is my favourite. I have been wanting to play with this Dress Up Framelit Die for some time. Anyone that knows me and my little ladies will know how excited I was when I saw this in the catalogue. The sentiment came from the All Dressed Up stamp set. I used Early Expresso Co'ordinations card on the dress stand to get an aged look.

Friday, September 14, 2012

Card #4

Mmmnn I keep using the Blossom punch, I wonder if I could class this as one of my favourites now! Actually I used a few punches in this card. The ornament punch made the leaves. Can you work out the others?
The Summer Smooches DSP is pretty cool, I think it might find it's way to my little ladies, you'll just have to stay tuned.
I embossed the Whisper White card with  the new Adorning Accents embossing folder. All the punched edges were sponged to give each layer a bit of depth. Such a quick and simple card.


Cardstock: Island Indigo, Old Olive, Tangerine Tango, Whisper White
Smooches Designer Series Paper
Ink: Island Indigo
Accessories: Basic Rhinestone Jewels
Stamp sets: Elements of Style
Punches: Blossom punch, 13/4" circle punch, Triple-Layer flower punch , Itty Bitty Shapes punch pack, Ornament punch
Related Posts Plugin for WordPress, Blogger...