Search This Blog

Would you like to join Stampin' Up!® - Come join my team, get discounts and make new friends. As long as you are in Australia you can join my team.

Sunday, February 24, 2013

Back to the ole blackboard days

I love this technique that is around at the moment. It is the blackboard technique and it allows for you to be messy. I held back on trying it out as I find it a bit hard as I try not to be messy.
However at our Demonstrators meeting today I was taken out of my comfort zone.

Rebecca Ross showed us her version of the technique and I must say I loved it. We stamped images in White Craft ink and then embossed in white embossing powder. Then we lightly dragged the white ink across the card with a sponge, making it look like the rubbed out chalk on a blackboard.

Well I liked it so much that I had to try it again when I got home. Here is my version.

Saturday, February 16, 2013

On a roll

Well I had a productive day today. I finished creating the 3 cards for my next stamp class in March and have even written instructions for 2 of them with pictures. So make sure you keep either Wednesday 6th or Friday 8th free and come along for a big night.

I then wanted to stock up on some cards so here they are.

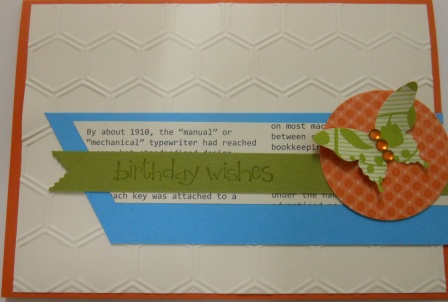
The first one was CASED but I don't know who from. If you recognise your work thank you for the inspiration. I used Tangerine Tango card and teamed it with Very Vanilla, Tempting Turquoise and Old Olive. Don't you just love the Colour Coach for helping you put colours together? I sat the Elegant Butterfly Punch on a 23/4 inch DSP circle. The Birthday sentiment is from an old SAB set called So Happy for You. I keep dragging it out as I love the font.
This one I had to really scramble to get things to work. I thought I had Pool Party ribbon but I must have used it all, so I got my Very Vanilla Seam binding ribbon and dragged it through the Pool Party stamp pad. Yuk, that looked dreadful it didn't look at all like Pool Party. So I decided to wash it out and "what do ya know" it came out this nice Pool Party colour. Yipee... I then wanted it to look scrunchy so I squeezed it up and then put the heat gun on it to dry it out and set the creases. I stamped the Happy Birthday sentiment with Versamark and embossed it with White embossing powder. I then used a paint dauber and Pool Party ink to colour over the card. I rubbed the ink off the embossing with a tissue to make it pop.

My last card is my favourite. I have been wanting to play with this Dress Up Framelit Die for some time. Anyone that knows me and my little ladies will know how excited I was when I saw this in the catalogue. The sentiment came from the All Dressed Up stamp set. I used Early Expresso Co'ordinations card on the dress stand to get an aged look.

Thursday, February 14, 2013

Happy Valentine's day

Who got spoilt today?
I had coffee and cake with my lovely husband at our favourite place Cafe Mila. Then came home and played for the afternoon in my craft room. Who could ask for more.  I was working on my next card class and I'm quite excited with what I have come up with. No peeks just yet, you'll just have to wait a tad longer.
.
This months class included a Valentine card of course. I brayered Real Red over the Glimmer paper to give it a pinkish tint. The DSP came from the pack Festival of Prints. Such a versatile little pack. The hearts were cut out of the Heart to Heart retired punch. The sentiment came from my very favourite stamp set Teeny Tiny Sentiments.  This is the perfect stamp set for someone that is just starting out as it has every type of sentiment they would need.

The other two cards we made showed how easy it is to use the same layout and make a small change to the embellishment thus changing the look of the card.
Isn't the DSP lovely I was lucky enough to get it as a free Sale A Bration gift. The new Seasonal Catalogue has so many yummy products that I just had to have. The bonus of course was getting the free gifts.

 
 I hope you all had a great Valentines. Now time for bed and sweet dreams of what I have in store for my next class.

Saturday, February 9, 2013

Our new Seasonal Catalogue and Sale A Bration

What more temptations can Stampin Up come up with?

Sale A Bration, that’s right, it’s everyone’s favourite time of the Stampin’ Up! year, and it’s better than ever, with no less than 19 free products to choose from with your qualifying order of $100.


There are many ways you can benefit from Sale A Bration........Try one or all of these.

Host a workshop and you can qualify for additional bonuses.
 
Love to shop? How about shopping and getting rewarded?

Join Stampin' Up!
 
Sale-A-Bration + Stampin' Up!'s 25th anniversary = 25% more Starter Kit products for FREE
Their is also a new recruit bundle including the following products from the 2013-2014 annual catalogue:
  • Happy Day Stamp Set
  • Modern Medley Designer Series Paper
  • Hardware Clips Essentials

Truly something for everyone! How will you party?

Then we have the new Seasonal Catalogue. So take a deep breath and check out the most fantastic products. It has 39 pages chock-full of yummy stamps and accessories. It has a lovely vintage feel, and there are so many pretty stamps and embellishments to take your crafting to the next level.

Have a flick through the Seasonal Catalogue and try to resist all the pretties.
Contact me now to book your workshop, place your order or for more information about joining Stampin’ Up!

If you would like your own copy of the Catalogue, plus a copy of the Sale-a-Bration brochure, email me and I will send you one (Australian residents only please)

Thursday, January 31, 2013

February classes

What a lovely way to start back by making something for your valentine. We will be making a Valentines day card using some of the beautiful Glimmer paper. We will also be making other cards with LOVE in mind but using the beautiful new sentiments from one of the new stamp sets.
As it is my birthday month some lucky person will be receiving a gift to help me celebrate.


When:
Wednesday 6th February 7pm start
Friday 8 th February 7pm start
 
Where:
My studio at Wellington Point

Cost: $ 10

What to bring:
Bring you own basic tool kit, adhesives and dimentionals I have a small supply just arrived of Snail refills, Dotto refills and Dimentionals. These can be purchased from me on the night if you wish.

Please confirm if you are coming so I have enough kits prepared.

Friday, January 25, 2013

Happy New Year

Wow where did 2012 get to? Happy New Year to everyone I do hope you all had a great Christmas and feel refreshed for the year ahead.
I have some great ideas for classes with new and old techniques so grab your diaries and organise your crafting year.

 
February - Please BYO basic tool kits and adhesives
Wednesday 6 th -  7pm "Be my Valentine" and more $10
Friday 8 th - 7pm "Be my Valentine" and more $10

March  – Please BYO basic tool kits and adhesives
Wednesday 6 th - 7pm "Tri shutter" and Easter $10
Friday 8 th - 7pm "Tri shutter" and Easter $10

April  – Please BYO basic tool kits and adhesives
Friday 12th - 7pm "Mothers Day and more" $10
Wednesday 17 th - 7pm "Mothers Day and more" $10

May  – Please BYO basic tool kits and adhesives
Wednesday 1st - 7pm "To be advised "
Friday 3rd - 7pm "To be advised"
Wednesday 29th - 10am "Childrens holiday class" $10
Friday 31st - 10am "Childrens holiday class" $10

June  – Please BYO basic tool kits and adhesives
Wednesday 12th - 7pm "To be advised"
Friday 14th - 7pm "To be advised"

July  – Please BYO basic tool kits and adhesives
Wednesday 10th - 7pm "Stamp n stack" Christmas in July  $25
Friday 12th - 7pm "Stamp n stack" Christmas in July $25

August  – Please BYO basic tool kits and adhesives
Wednesday 7th - 7pm "Fathers day and more" $10
Friday 9th - 7pm "Fathers day and more" $10

September – Please BYO basic tool kits and adhesive
Wednesday 4th - 7pm "To be advised"
Friday 6th - 7pm "To be advised"
Wednesday 25th - 10am "Childrens holiday class" $10
Friday 27th - 10am "Childrens holiday class" $10

October  – Please BYO basic tool kits and adhesives
Wednesday 9th - 7pm "To be advised"
Friday 11th - 7pm "To be advised"

November  – Please BYO basic tool kits and adhesives
Wednesday 6th- 7pm "Stamp n stack" $25
Friday 8th - 7pm "Stamp n stack" $25

December – Please BYO basic tool kits and adhesives
Lets party while we have fun.
Wednesday 4th - 7pm "Christmas gifts" $20
Friday 6th - 7pm "Christmas gifts" $20

Monday, November 26, 2012

Surfie girl

My friend asked me to make a 21st birthday card for her daughter. She wanted something beachy as she is always at the beach surfing. This is what I came up with.
I sanded back some Early Expresso Coordinations to make it look very, very rough. Of course I had to try some more brayering. I made the sun by masking after I had brayered a layer of Daffodill Delight. I then covered the sun and brayered the sky. The water was created by wrapping cotton around the brayer and then loading up with Indigo Blue. I ran it over scrap paper a few times to weaken the strength.The sand was squiggled with the White gel pen along the water's edge.
Next came my little surfer girl. She was made with White gloss card and I brayered it with Pink Pirouette. The surf board was brayered by masking one side and then brayering with Summer Starfruit. I then masked that side and brayered the other side with Primrose Petals. Her hair was cut from sanded Early Expresso coordinations card.


This is what she finally looked like minus the 21 that I added and forgot to photograph. Do you recon she will like it?

Thursday, November 22, 2012

My ladies with brayered background

Now for a couple of ladies.  I found this great calendar with heaps of Art Deco style ladies. So that was my inspiration for this first card.

The background was done in sections as I wanted a night sky, water and land.
The sky was brayered in layers starting from the lightest to the darkest.
The water was done by wrapping fine cotton around the brayer and then loading with ink. I ran it off on scrap paper to make it less intense. I made a few squiggles with white gel pen to make it look like ripples on the water.
The land was brayered in layers the same as the sky but using the earthy colours.
The bridge is the Scallop Trim Border punch which I snipped into at each scallop.

The next card was very simple. The background was created by brayering bubble wrap and then laying the gloss card on top. I put scrap paper over and then brayered over. My lady was drawn with a fine black permanent marker on to yellow tinted acetate. I then cut it out and pasted it on to the card.  See as I said simple.

Wednesday, November 21, 2012

More brayer techniques

Here we are with a few more cards using the brayer.

Gloss card brayered with Calypso Coral.
Then brayered from each corner with Old Olive.


Brayer was wrapped in cotton and then loaded with Midnight Muse.
Then brayered over Whisper White card.

Background brayered with Summer Starfruit.
Then masked with ripped post it notes.
Then brayerd with Cajun Craze.
Background brayered and masked.
The top was then bounced with the brayer.
 

Tuesday, November 20, 2012

Brayer techniques

As promised here are a few cards I made for our Heartfelt Event.
The first few were all done by brayering in layers of ink starting from the lightest to the darkest.


Card: Cajun Craze, Whisper White, White Glossy, Wild Wasabi, Perfect Plum, Always Artichoke, Festival of Prints DSP
Stamps: Come to Bethlehem, Friendly Phrases, Dinoroar, Silhouette Sentiments
Ink: Calypso Coral, Cajun Craze, Certainly Celery, Lucky Limade, Gumball Green, Black Stazon, Wisteria Wonder, Perfect Plum, Daffodill Delight, Old Olive, Versamark, Primrose Petals

Stay tuned I will post more tomorrow.

Monday, November 19, 2012

Please meet my friend ....

The Brayer....
My newest favourite Stampin Up tool. On Saturday I was one of the Demonstrators who manned the brayer table on Product Playground at our Brisbane Stampin Up Heartfelt Event. Because of this opportunity I have come up with so many different ways to use the brayer I decided to make up a Brayer Sample book. Here are a few pages...
Background using ink refills dropped on to acetate and brayered. Then place gloss card face down and brayer

Ink refills dropped on card, fine cotton wrapped around brayer and glad wrap wrapped around brayer

Background is various thicknesses of cotton wrapped around brayer, masking, ink refills spritzed on card and brayered
Using the embossing folder with white craft ink and dazzling diamonds.

Background bleached bubblewrap and felt snowflakes dipped in bleach and brayered. Resist with clear gloss and versamark

Top background is brayered ink, spritzed and rock salt left to dry. Bottom background dark card brayered with white for misty look. Brayered and sanded, wax paper scrunched and ironed and brayered

Top background dark card brayered with string and then stamped with bleach. Bottom layer brayered in a frame Brayered and embossed stripes and tartan..

Background ink refills dropped on to acetate, spritzed and brayered, then gloss card placed face down and brayered.

I would like to share this sample book with all my Paper Angels Team as I think it would be a great training tool for new brayer users. Just ask me if you would like to borrow it for a class.

Oh just remembered..... please make sure when storing your brayer that you rest it on it's back.

Sunday, November 18, 2012

While storms raged outside...

Just beat the heavens opening up thank goodness. What a terrific storm the trees were bent to near breaking point. AND all the while all the Stampin Up Demonstrators and their friends were safe inside the Convention Centre creating a storm of their own with card, ink, stamps, big shots, brayers etc. It was Brisbanes turn for the Heartfelt Event and I was very proud to be one of the demonstrators in the Product Playground area. Anna Wheaton, Genelle Little and myself were on the Brayer table. What is a Brayer you are all asking? Well it is now fast becoming one of my favourite tools. If you have been following my blog for a while you will realise I am a little bit arty farty and the brayer has just given me another tool to play ladies with. Although I did actually do a few cards without my ladies. I'll post some of them in the next few days.
So here's a breakdown of the day......

Arrived at the Convention Centre and set up the Brayer display boards and sorted out what we were all doing.
The doors opened at 10am and then the fun began. I was first up on the table and introduced some demonstrators into a brand new world of fun and creativity. Many had bought brayers and now really experimented. (This is yet another of the things I like about Stampin Up. Product Playground lets you play with the product and learn how to use it). I have a feeling that there might be a few brayered cards making their way into homes this christmas.

12.30pm Anna took over and I had a very quick lunch before heading off to the Handmade gifts presentation by Ruth Clarke. She came up with some innovate ways to create easy and beautiful gifts out of our yummy fabric. I think a few of my dear friends may be getting some of these for pressies in  the near future.

Next I did a quick dash around the display area and took a few pics of all the lovely displays. No time to dilly dally though as it was then into another presentation by Sophie Zadeh on Decorations. Oh my goodness is all I can say. I wanted to go home and play straight away. Stay tuned as I will be posting photos of her decorations shortly.
By this time it was 2.30pm and I'm thinking, where has the day gone and will I cover everything? Had a quick cup of coffee to recharge the batteries and then off to the greatest presentation by Liz Collett.
Now I know I could be a bit biased as Liz is my upline but she had the most awesome Gingerbread house cards and her Wish jar was so innovative and I love how she created cards out of the Simply Scrappin Kits. She just blows me away with her creativity. I am so glad I am part of her team.
Straight after Liz was a presentation by Kirsty Brown, what a wag she is. I love her sense of humour. She came up with some great ways of decorating and packaging.
The brown paper that comes in all our deliveries got well used with wrapping gifts and then decorating with fab bows.
Phew! Have I got time for a wee break? Nuh. Gotta check out the Demonstration booths that are spread around the main room. Madonna Dunn had some different ways on using our markers. Kim Gavarra got me excited with our watercoulour crayons on fabric. That is a must try.
Oh I nearly forgot, I made a decoration to put on the tree and received a free gift for doing so. How good is that?. Running out of time so looks like the make and takes that we all received will be done at home. Had to go pack up the brayer table with the others and say goodbye to my new found friends. Then home, once again beating the storm. Thunder and lightning and torrential rain sent us to bed early making sure we pulled out all the power leads from the appliances. Ahhh what a day.

Saturday, November 3, 2012

Loving the Big Shot

The Big Shot is such a great machine. I find I am using it more and more with my projects. Gosh and to think that I once said I would never need this machine.
I was asked by a friend to make a book for her sons 21st birthday. She wanted something that all the guests could sign. I had forgotten that I took photos of this book until I downloaded my camera today. So pleased I did as it is always good to look back on what projects one does.
So here are the pics and a description on the pages......

I used some very thick craft board that I had put away "Just in Case" I could use it one day. I glued Very Vanilla card to both sides of it and then ran it through the big shot with the Scallop  Square die. I found a Celtic type cross online, so printed it off and cut it out so that I could make a mask. I sponged randomly over the page, spritzed all over, then removed the mask and spritzed a little more. I then covered it all in Versamark and clear embossing powder and heat embossed it.
For the back I prepared it the same way but instead of the Celtric Cross I cut out a 21 and stamped some keys.

All the other pages were covered with DSP. I cut out a frame from the now retired Beau Chateau DSP.
I made secret pockets and lots of tags that could be written on. The other DSP I used was the Neutrals Pattern Designer Series.
All the edges of the pages were sponged and then the pages were held together with rings.
I decorated the rings with bits of ribbon, string and a key. 


Related Posts Plugin for WordPress, Blogger...